Create a Customizable Backdrop in Minutes
La Palette Nude 1 by L’Oreal Paris

My husband and I recently moved, and I was able to take the entire 3rd floor bonus room as my office! The house was painted a lovely neutral grey before we moved in, which is right up my alley, but I began craving a little bit of variety for the background of my photos.
I considered wallpapering a wall, or adding a removable decal, but in the end I couldn’t bite the bullet and wasn’t able to find something that I was looking for.
And then I remembered that before I had neutral walls, I used to own large canvases to use at backdrops for product photography.
So I turned to Minted, of course, because I’ve been dying for a reason to use some fabric from their options. It took me nearly 2 days to finally decide on what I wanted to use.
I wanted it to have some purple, like my logo, and be a little bit busy but still soft on the eyes. I didn’t want anything too geometric because I knew I wouldn’t be able to line everything up *perfectly* and that would drive me nuts.
So I found this beautiful floral fabric and now that I have the backdrop made, I’m thrilled with it.
All you need is some fabric you love, a canvas, scissors, and a staple gun.
Begin stapling on one of the long sides, pulling taut.
Complete the opposite side next.
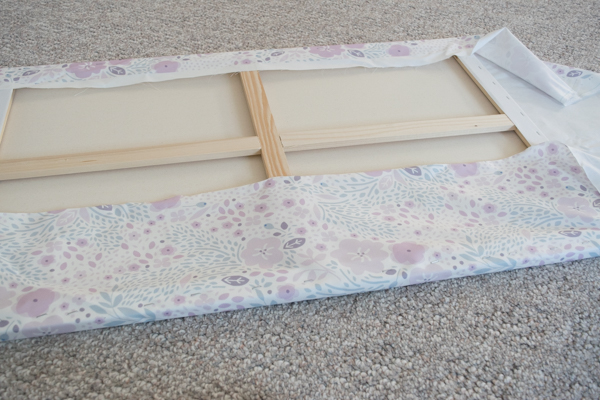
Finish the third side, and then as you are finishing the final side make sure you are pulling everything straight and tight. Leave the corners for last!
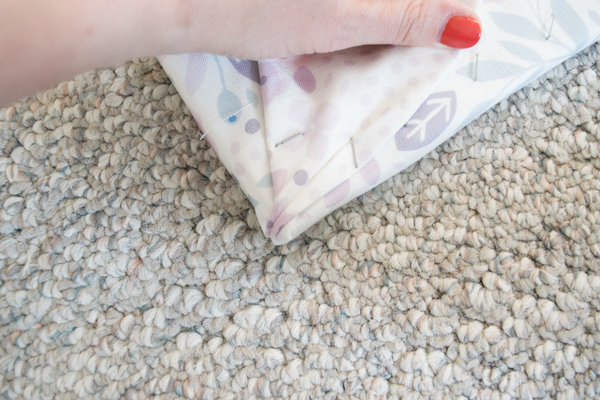
Fold the corners like you would when wrapping a gift. Staple these enough to make sure they are very secure!
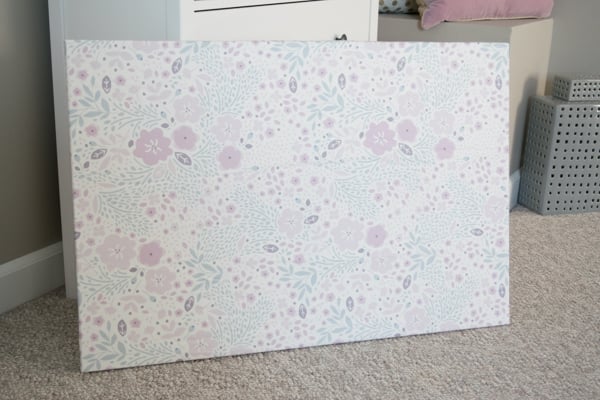
And that’s all! Super simple. I like to use it as a background “wall” or even as a place I can lay products out on.
If you aren’t a blogger, this could be a great project for homemade art, or a backdrop for photos of your pet. The options are endless, and it’s just too easy to pass up.
It took away the commitment of wallpapering a wall, but still left me with an option to change up the background of my photos.
This fabric was a gift from Minted. If you dare venture their selection be prepared to spend 2-7 hours browsing. It’s dangerous.

comments
Hi Kate! Love your blog, and what a great idea for some quick and easy decor. I like the idea of doing a few smaller canvasses and hanging them together on the wall in a gallery type way. What a great alternative to painting or something more permanent.
Also, just a friendly note: I believe it is “taut,” not “taught.” As in “pull the fabric taut” rather than “I taught you to pull the fabric.”
thanks!
Lol! I always thought it was “Taunt” in my head. You learn something new everyday. Thank you for kindly pointing that out. 😉
This is something I’ve been struggling with and I can’t believe this has never crossed my mind! Guess a trip to the art supply and fabric store are on order for this week. Thanks so much for sharing this.
Oh I love this! The fabric you chose is great! And I just started looking at their website and I can tell already that I love all the fabric. Thanks for the tip!
Love this idea! I love doing photography for my blog (and food can be tough to photograph sometimes!), but I’m definitely going to have to put my spin on this! Thanks for sharing!
Such a good idea – can’t wait to try something similar!
Laura
http://www.24-7style.com
Thanks so much for the tip! I’ve just been using white and black foam core but it bends and dents easily! LOVE this tip, and your blog!
This is such a great idea! I’m new to the whole blogging scene and have been trying to figure out a good way to showcase products! Thanks for the tips!
Mary Kate
http://www.mynewchicagolife.com
Love this idea! Minted’s products are always spot-on.
This is a great idea. Also it really helps spot those stolen pictures when people do that.
Another budget friendly option to use instead of a canvas is the inch-thick foam insulation panels that you can find at home improvement stores. I did some fabric art for my bedroom walls, and they are very light to hang and can be cut to whatever size you want. Love the fabric choice, Kate!
This is a brilliant idea! I’m moving in a couple days to an apartment with the ugliest dark tan walls. I’ll need something like this to brighten up my background! Thanks for the idea.
xx
Jenny // Mish Mosh Makeup
Such a good idea! I have never thought to make a backdrop using canvas! I recently bought some vinyl backgrounds and haven’t really used them much because they look like backdrop aka not natural. I will have to try this next 🙂
Kelsey | http://www.abalancingpeach.com
this looks great! I never thought about it but doing this would be so useful for photos!
Kim
http://trendkeeper.me .. Day to NIGHT & Office Dress!
That’s a great idea! I’ll have to try it out sometime soon.
Emma // http://thebeautyingenue.blogspot.com/
I love the fabric!! I have framed fabric and scrapbook paper before to make “custom” pictures when I couldn’t quite find what I was looking for to decorate. I love your blog Kate!!!
So cute!! I love the fabric you chose
This is a great idea and budget friendly too! Thanks for sharing! I am new to your blog and loving it so far!
Cute! I love this idea!
Her Heartland Soul
http://herheartlandsoul.com
Fantastic idea!! I love that not only is it easy to make, but it’s easy to store and doesn’t take up much space.
Wow what a great idea! I will be trying this on my next pics! Thanks!
http://www.writingmotherfashionista.com
Wow, such a great idea!I’ve been trying to think of a way I can incorporate different backdrops into my photos and could only come up with painting my wall or getting a new floor, but this is a much cheaper and more versatile alternative.
Thank you so much for sharing!
Kelly xx
The fabric you chose is so pretty!! Minted has the best stuff.
Very clever and creative! I just lost 2 hours of my life on the Minted website lol
I love this! I have a couple of canvases that I started and never finished or didn’t like the end product. I was going to paint over them but I think I’ll just pick out some nice fabric!!
I love this idea! I’m working on launching a new blog site and so often I get bogged down by “ugh, I don’t have that fancy such-and-such like so-and-so.” I love that this is a simple, easy, affordable option that makes photos look so put together!
Great idea, I am going to have to make something similar! Xo, Stephanie
Thanks for sharing this awesome super simple project. i should give it a try!
Oh my WORD this is so clever! I’ve been taking aerial shots for my blog but I’m getting bored with it so this is brilliant and clever and I cannot wait to try it and start mixing things up photography wise!
I love Minted for stationary! I’ve been planning my wedding and love browsing the designs and am thinking of using one for the liner in our invitation envelopes!
Thanks again for all you do. I love to see when I get the notification there is a new video. My weekend treat is it sit down and catch up on your blog!! I really like the charming love print from minted!!!